Hello my Cherubs!
As you all know, V Day is coming around again!
For those of you lovely ladies who are lucky enough to have a date, (or even those of you who have decided to boycott the day and go out with your friends instead!), I thought I would share a step by step guide to creating a really pretty, fresh, glowy look that would be perfect, however you wish to spend the day!
Here is a list of what you will need to create the look:
1. Flat eyeshadow shader brush, fluffy blending brush and blush brush.
2. Sheer foundation/tinted moisturuser of your choice and sheer loose powder or MAC MSF natural.
3. Concealer in your own shade and a stick concealer which is 3 shades lighter than your skintone (if you don't have one, borrow or just buy a cheap drugstore shade for a couple of pounds - quality is not important for this little trick)
4. Bronzer with a bit of shimmer
5. Peachy/pink matte blush
6. Highlight - cream or powder (I suggest MAC MSF in Soft and Gentle/Ricepaper Eyeshadow/ Strobe cream or Benefit Moonbeam or Highbeam but feel free to use whatever you have handy)
7. Shimmery/glittery creamy coloured eyeshadow (I used the lighter colour from the NARS Sugarland duo)
8. Matt medium brown eyeshadow
9. Black kohl pencil
10. Eyelash curlers
11. Your favourite mascara
12. Girlie rosey pink, glossy lipstick (Lovelorn from MAC would be perfect)
Steps:
1. Apply your foundation or tinted moisturiser all over your face and blend well with your fingertips. Apply your own shade of concealer over any blemishes and under the eyes.
2. Now the magic trick to keeping your face glowy, fresh and bright! Take the lighter shade of stick concealer and apply to the inner corner of the eye next to the tear duct first. Tap gently to blend.
Next, smear some of the same concealer onto your ring finger and smooth thinly and evenly all over your eyelids up to your browbone. This will be your primer for your eyeshadow to stick to.
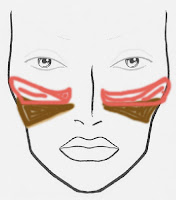
Next take the same light coloured concealer and starting at the point that the undereye area joins to the tops of your cheeks, draw an upside triangle straight down against the sides of your noses, to a point at the bottom of the apples of your cheeks. Smooth, blend and tap using your fingers to really blend the concealer into your skin. The key is to ensure the light colour isnt visible as a separate block of colour against your skin. This is naturally an area of your skin which catches the light, so you will enhance the effect to make your skin brighter and clearer and glowier!
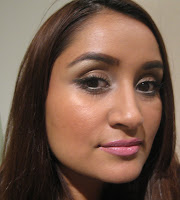
Finally, take the same light concealer, and carefully line your waterline (lower rim of your eye) as if you were applying kohl to your eyes! Try not to get it onto your lower lashes. Again, this is another makeup artist trick to make your eyes look wider and rounder and fresher! See pic below - my eyes look rounder and brighter than usual. 
 See the above facechart as a guide to where to place the light coloured stick concealer.
3. Very lightly set the concealer with your powder.
4. Next take your bronzer (I used a cream to powder bronzer by NARS called the Palm Beach Multiple but feel free to just use powder bronzer), make a fishy face (i.e. suck in your cheeks), and starting at the hairline, blend the bronzer just above the sucked in part of your cheeks. Don't go too far in to the centre of your face and dont go too far up onto the actual cheeks either. Blend softly upwards (not downwards!). Use a light hand as this is a technique called contouring, which is basically emphasising natural shadows under your cheekbones to make your cheekbones appear higher.
Next take your peachy pink matt blusher and apply the blush (again starting at the hairline) slightly onto and slightly above the bronzer blending the two colours together. See face chart for a guide as to where to place the bronzer or blusher. Although if your face actually resembles the face chart, please wash everything off and start again hahaha!!!
5. Take your highlight and blend onto the tops of your cheekbones, down the bridge of your nose, onto your browbone just under the eyebrow and finally into the cupids bow (edge of lip which is directly above centre of top lip).
6. Take your shimmery, creamy coloured eyeshadow and pat and press onto the eyelid only (don't go above the crease/socket). Place the shadow also over the inner tearduct area where you put the light coloured concealer.
7. Take your fluffy brush and tap gently into the brown eyeshadow. Blend this colour into the crease/socket, blending until it is softly blended with the top edge of the shimmery eyeshadow and just up to the bottom edge of where you placed your highlighter. Take a bit more of the brown and smudge it onto your lower lashline.
8. Take your black kohl and create a top liner and wing out slightly.
9. Curl your eyelashes and apply mascara.
10. Apply your pink lipstick
Ta daaaaa!!! You should look fresh faced, wide eyed, clear skinned, girlie and pretty with just a hint of sexy black eyeliner along the tops of your eyes!
In my opinion this is a perfect Valentines Day look, as generally speaking, men love the natural look in terms of makeup (I am pretty sure they like us to look angelic neck up, and erm, slightly less so neck down hahahahahahahaha!!!!!!!!! Ooh how very un-PC of me!! Hee hee!)
This sounds like a lot of makeup but it's really more subtle and relies heavily on contouring and highlighting rather than covering your face with lots of colours. Remember to blend, blend, blend!!
I did take some pics of me but although I loved the makeup, I wasn't thrilled with the quality of the pictures, so apologies for that!
What are your V Day plans?
xoxo Angel5ace xoxo

No comments:
Post a Comment